1) MikroTik Quick Scripts
Run these via
WinBox
or
SSH. Edit interface names (e.g.,
ether1) and credentials for your router. Snippets are
additive
and won’t wipe existing config.
A) Create WAN
Choose DHCP (typical cable/fiber) or PPPoE (common with ISPs). NAT masquerade included.
Commands
/ip dhcp-client add interface=ether1 use-peer-dns=no add-default-route=yes disabled=no
/ip firewall nat add chain=srcnat out-interface=ether1 action=masquerade
Commands
/interface pppoe-client add name=pppoe-out1 interface=ether1 user=YOURUSER password=YOURPASS add-default-route=yes use-peer-dns=no disabled=no
/ip firewall nat add chain=srcnat out-interface=pppoe-out1 action=masquerade
B) DNS Server (caching)
Enable MikroTik’s DNS cache and use trusted upstream resolvers. We disabled “use-peer-dns” above so these resolvers are used consistently.
Commands
/ip dns set allow-remote-requests=yes servers=8.8.8.8,8.8.4.4Optional hardening: allow UDP/TCP 53 only from your LAN with a firewall rule.
C) System Clock (timezone & NTP)
Correct time is important for logs and PPPoE sessions.
Commands
/system clock set time-zone-name=Asia/Manila time-zone-autodetect=noFor RouterOs v6
/system ntp client set enabled=yes primary-ntp=121.58.193.100 secondary-ntp=0.0.0.0 server-dns-names=asia.pool.ntp.orgFor RouterOs v7
/system ntp client set enabled=yes servers=121.58.193.100,asia.pool.ntp.orgD) Hotspot Bridge (br-hotspot → 10.0.0.2/24)
Create a hotspot bridge for clients and the KiTifi device network. Assign
10.0.0.2/24
to the bridge, then add one or more access ports (e.g.,
ether2,
ether3). DHCP runs on the bridge.
Commands
/interface bridge add name=br-hotspot
/interface bridge port add bridge=br-hotspot interface=ether2
/interface bridge port add bridge=br-hotspot interface=ether3
/ip address add address=10.0.0.2/24 interface=br-hotspot
/ip pool add name=br-hotspot ranges=10.0.0.10-10.0.0.254
/ip dhcp-server add name=br-hotspot interface=br-hotspot address-pool=br-hotspot lease-time=1d disabled=no
/ip dhcp-server network add address=10.0.0.0/24 gateway=10.0.0.2 netmask=24
/ip hotspot add name=br-hotspot interface=br-hotspot address-pool=br-hotspot idle-timeout=10m addresses-per-mac=1 disabled=noether1/ether2, PPPoE
user/password, and LAN IPs to match your setup. These snippets add config; they do
not
wipe existing settings.
2) Flash the KiTifi image
- Download the image for your device:
OPi,RPi, orx86. - Insert a microSD/USB (8GB+ recommended).
- Flash the .img/.img.xz with Balena Etcher or Rufus.
- Boot the device. First boot may take a few minutes while services initialize.
3) First boot & access
- Connect the device to your
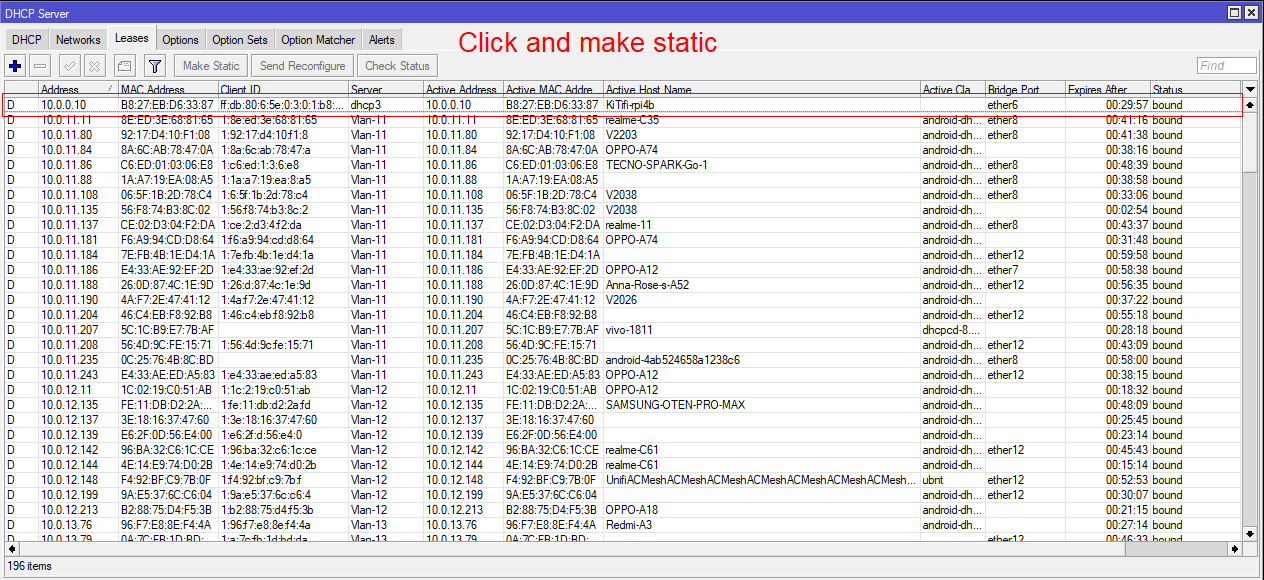
br-hotspot. DHCP is enabled by default. - Find its IP from your Winbox
IP → DHCP Server → Leases
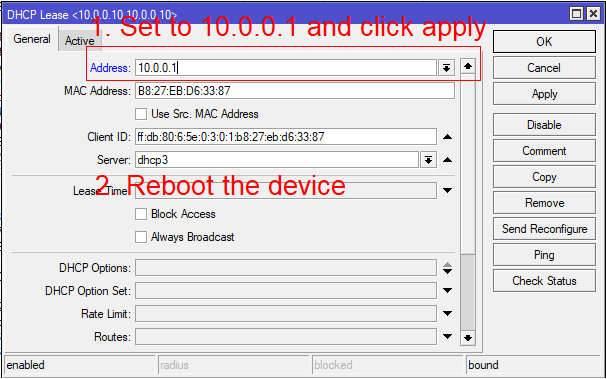
(e.g.,
KiTifi, usually
10.0.0.x) → Click and Make Static. Then go to IP → Hotspot → IP Bindings, + → set the same MAC → Type: bypassed → OK. - Open the web panel.
Default login:
admin/admin. Then change your password (Profile → Account). - Go to
Profile
and set your MikroTik connection:
Router IP
(e.g.,
10.0.0.2), Username, Password, API Port8728→ Save & Connect.
Network tips
- Use a reliable PSU on SBCs to avoid undervoltage.
- Prefer wired Ethernet for setup; Wi‑Fi can be configured later.
IP → DHCP-Server → Leases

IP → Hotspot
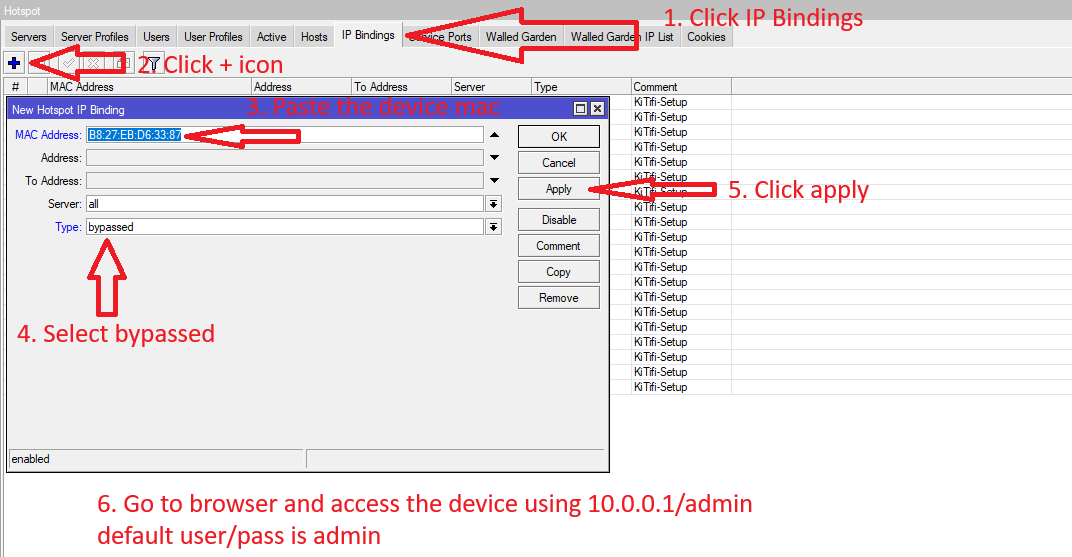
Access via browser and type → 10.0.0.1/admin default user/pass is admin
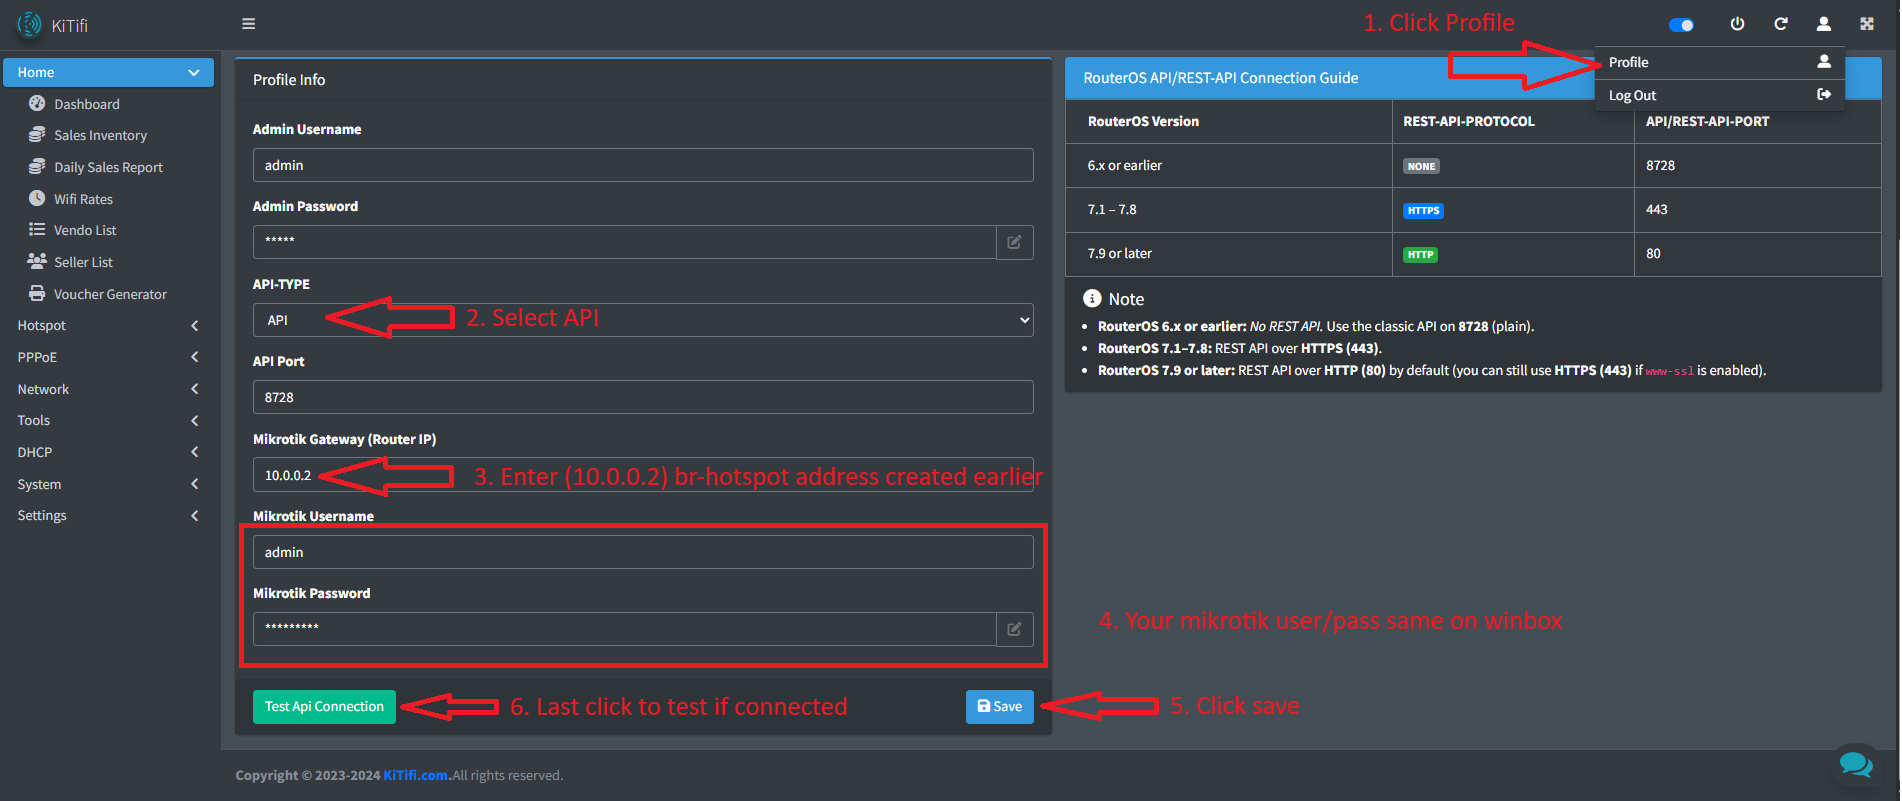
Connection Tip
If you get an error connecting to the API/REST-API, run the following commands in the MikroTik Winbox terminal, one line at a time.
Commands (API-TYPE → API) Recommended
# 1) Create group with api + write + read + password + sensitive + ftp + policy
/user group add name=kitifi_rest_api policy=write,read,password,api,sensitive,ftp,policy
# 2) Create user (change password)
/user add name=kitifi group=kitifi_rest_api password=kitifi
# 3) Enable /ip/services api port 8728
/ip service set api port=8728 disabled=no
Commands (API-TYPE → REST-API)
# 1) Create group with rest-api + api + write + read + password + sensitive + ftp + policy
/user group add name=kitifi_rest_api policy=write,read,password,rest-api,api,sensitive,ftp,policy
# 2) Create user (change password)
/user add name=kitifi group=kitifi_rest_api password=kitifi

# 3) Option A: For RouterOS 7.9+ enable /ip/services www port 80
/ip service set www port=80 disabled=no

# 3) Option B: For RouterOS 7.1–7.8 (HTTPS + cert) ...
# === Create CA ===
/certificate add name="KiTifi-CA" common-name="KiTifi-CA" key-usage=key-cert-sign,crl-sign days-valid=3650
/certificate sign "KiTifi-CA" ca-crl-host=10.0.0.1
/certificate set "KiTifi-CA" trusted=yes
# === Create Server Cert (REST) ===
/certificate add name="KiTifi-REST" common-name="KiTifi" key-usage=tls-server,digital-signature,key-encipherment days-valid=3650
/certificate set "KiTifi-REST" subject-alt-name=IP:10.0.0.1
/certificate sign "KiTifi-REST" ca="KiTifi-CA"
/certificate set "KiTifi-REST" trusted=yes
# === Enable HTTPS (www-ssl) for REST ===
/ip service set www-ssl disabled=no port=443 certificate="KiTifi-REST"